
Setting up return portals
In this article you will learn how to setup and edit your shopper return portal(s).
Overview
Once logged into Float, navigate to:
**Float > Portal
Here you will be prompted to create your first returns portal.
After the first portal, you can create additional return portals via:
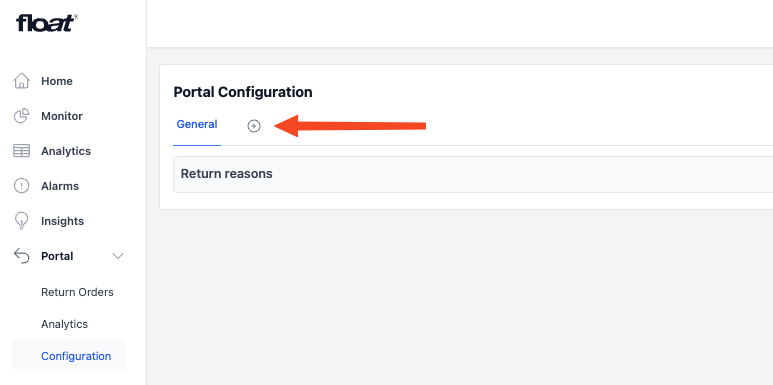
**Float > Portal > configuration:
Once you have created your return portals, you can now configure and complete the set up, head to:
**Float > Portal > configuration:
Here you will find a tab structure with a General tab and Individual tabs for each return portal (e.g., Return portal A and Return portal B).
Below guide will go through how to set each of these up.
General tab (return reasons)
In the General tab you can build your own custom return reasons or simply choose the Float default reasons.
Default return reasons
Default return reasons that are used when no custom reasons are defined or if all custom return reasons are disabled. Float will automatically translate the language of the return reasons to match the store or markets language your customers are used to.
Custom return reasons
You can configure custom return reasons that your customers can choose from in the portal. When you create custom return reasons the default reasons are disabled.
Creating custom return reasonsWhen you create custom return reasons the default reasons are disabled, meaning that if you want custom return reasons you have to create a full new set of return reasons.
Configuring a custom return reason
Add a custom return reason by clicking the "+ add a reason".
- Give it an appropriate name (for internal display use: see "Naming a return reason" below)
- Add mapping to Shopify's return reasons
- Optionally add a classification
Tip: you can ignore the order of the return reasonsThe return reasons are presented to the customer in random order, so the creation order does not matter.
Naming a return reason
The name of the return reason is used internally across the Float platform (e.g Analytics). We recommend choosing a name that is easy to understand and relates to the return reason. e.g "Small in size"
Classifying a return reason
Classifications allow us to use your return reasons to find insights on your products such as if a product fits large or small to size. It is highly recommended to add classifications.
Translating a return reason
It is required that you translate your return reasons into the languages in which you provide your portal(s).
Tip: The return reasons are presented to the customer in random order, so the creation order does not matter.
How to revert to default return reasonsTo go back to using standard return reasons, you can disable all custom return reasons.
Individual return portal tabs
In these tabs you can edit your shopper return portal UI, set return policies, carrier integrations and more. Below guides you through the process.
Return policy
Setup your return window and add any potential custom policies.
The number of days are counted from the date of delivery to the customer. If the delivery date is not available in Shopify the return window is calculated as fulfilment date + 10 days + return window. Essentially, delivery date is estimated as fulfilment date
Please see DOCUMENTATION > RETURN POLICY for more details.
Refunds
Setup your refund configuration to manage how refunds are processed through Float.
The basis premise is that there is a default return fee which will be applied to all returns unless you create a specific return fee policy (special condition) that overrules the return fee.
The return fee policy allows you to define different return fees in different scenarios. Examples of return fee policies might be:
- If the customer is returning from a specific country, set a higher/lower return fee than usual
- If the customer is tagged with VIP, set a return fee of 0 (free return)
Each condition is evaluated in the order shown in the list of conditions (top down) and the first one that applies to the return is used.
If you re not processing refunds through Float (either manually or via WMS integration), you should not press "enabled".
However, you can still set the default fee and additional refund policies. If refunds are not enabled these will then still be displayed in the return portal to guide customers.
Portal UI
Here you can edit your shopper return portal UI. Float have default texts for all different languages, but you need to populate the following:
- Website url (your website)
- Favicon (small, graphic icon associated with a website that appears in browser tabs)
- Logo (you company logo)
- Background (a background picture)
- Document title (the descriptive text shown in the browser tab)
- Need help text (here you can list a customer service email)
All other text fields can also be edited and customised. Scroll all the way to the button and use the "Edit" function - that will allow you to edit all text and input fields.
We recommend using Shopify CDN stores files (from Shopify content)
Carriers and return address
Here you define the return address as the location of where returns need to be delivered and you can can configure shipping carriers to generate labels.
Shipping carriers setup
You need to define a default carrier, which will serve as the standard option unless another carrier is specified for the relevant return country.
There are two types of carriers:
No label: The customer will not receive a return label. This option can be used if you are pre-printing labels and including them in parcels, or if you want customers to obtain labels themselves in certain countries.
HINT: Merchants often use "No label" as the default return carrier and then only provide labels in the countries where they want to offer return labels.
Return label via carrier integration: This could be a label generated directly through a carrier integration (e.g. UPS, GLS) or via a TMS (e.g. Webshipper).
For more information see "Shipping Carriers" under the "INTEGRATIONS" section.
Return instructions
Once a return is confirmed in the returns portal, a confirmation message with the return instructions — and, if applicable, a return label — is presented to the customer.
You need to define specific return instructions for each carrier.
HINT: Mention that a copy of this information/label will be shared via email soonSince these instructions (and the label, if applicable) will also be shared with your customers — either via a Klaviyo flow (if the integration is activated) or via the Shopify return email notification — it’s a good idea to mention this in the return instructions.
Exchanges
This feature allow your customers to exchange their returns to a different product variant or a completely different product when returning.
You will need to review each of the following settings below:
Enabled
This is the master button to switch the entire feature on/off.
When switching this feature on, it will as a minimum allow your customers to exchange to a different variant. For more advanced exchange options (across products) see Advanced Exchanges below.
Prepaid exchanges
Turning this function on will make all exchanges run on our prepaid exchange flow. If this option is not enabled, exchanges will automatically follow the standard exchange flow.
Please go to Documentation > Exchanges for a detailed breakdown of the differences in exchange flows.
Allow exchanges to same variant
When enabled customers can exchange to the same variant of the product.
Inventory locations
Restrict exchange availability to certain inventory locations. If not specified, Float will offer exchanges from all inventory locations.
Minimum inventory required
Set a minimum inventory amount required to offer an exchange.
Auto-approve
When enabled all exchanges are automatically approved as soon as the customer request them. Once approved they will be added to Shopify as new orders and sent to the customer.
OBS: This means that there is no approval process and that the system is not waiting for return confirmation of the original return item.
Shopify native exchange flow
When enabled Float will use the native Shopify exchange flow instead of a pre-paid or standard flow.
Please go to Documentation > Exchanges for a detailed breakdown of the differences in exchange flows.
Advanced exchanges
When enabled customers can request exchanges across any product regardless of price. This is a more advanced form of exchanges vs variant exchanges.
Please go to Documentation > Exchanges for a more details on the advanced exchanges feature.
Advanced exchange bonus
Offer customers a bonus on top of their return value to incentivise the exchange. This feature only becomes relevant if the customer has not already exchanges for a different variant.
Please go to Documentation > Exchanges for a more details on the exchange bonus.
Advanced exchange collections
You can restrict what products are offered as advanced exchanges. Select one or more Shopify collections to restrict. If no collections are selected the system will make all active products available.
Gift cards
This feature allow your customers to choose a gift card as an alternative refund method to getting refunded on their card. Gift cards will always entail a 0 return fee and as that creative incentive for customers to select this option. In addition, you can provide some extra value on top of the gift card to create strong incentives.
Configuring the gift card e-mail
Gift cards are shared via the standard Shopify gift card template and notification text from your store. You can change and update the appearance directly in Shopify.
Error checking
Please note that gift cards are not available as a feature if you are running the pre-paid exchange model.
Warehouse
If you are using a WMS to handle logistics or if your 3PL is using one, Float supports a direct integration to automate the entire return and refund process.
Please find your WMS (or request a new integration if it is not on the list) and enter your credentials.
Before going live, we strongly recommend creating a test order to see that the flows works effortlessly.